If you want your beloved playlist according to your wish, burning a music CD is one of the best options, rather than choosing and changing the song. It spoils the mood of listening to music. Instead of buying a CD from a store, it’s better to make one at home. Self-made Audio CDs are better. Computers, sound systems or CD players, all require a CD to play music and videos. But it should be kept in mind that these are different from data or Mp3 CDs. A CD burns easily if one has a CD – RW or DVD – RW, audio files, a black CD and a media player.
- Sponsored Links -
While using Windows as the platform, burning CDs is little easy. You can download the Audacity recorder and install it. This is one of the powerful tools to burn CDs, photos, music, and whatnot. It supports the Microsoft System and Windows 10 too. It works both on 32- and 64-bits systems. The default settings are already existing in the settings of Audacity. You don’t need to change these settings before exporting the file.
Ways to Burn CD Files
A computer should have a CD RW or DVD RW. Here W means writable. This is where the CD burns. Place the CD into the disk drive of the Computer and you can enjoy the streaming on the Windows without hustle.

- You need to export the file into WAV or AIFF. The file, in which exports to the WAV format, should be on a stereo track. The project rate sets at 44100 Hz. It is there at the bottom left of the project window. The 16-bit file saves in the file export dialog using Save as type format.
- After locating, the project rate box at the bottom left of the window, if it is not in 44100 Hz then click the box to adjust it to the same format and size.
- You should add a stereo track if the file doesn’t possess the same. It is because Audacity sometime doesn’t work if it doesn’t have the stereo track; so add one. To add the same just click on “Add new” by clicking the “Tracks” on the top menu bar.
- After clicking the “Add new” just click the “Stereo Track”. It might seem that a second line is appearing just below the first track but doesn’t have any audio.
- Now just click ” File” from the top menu and then click “Export“.
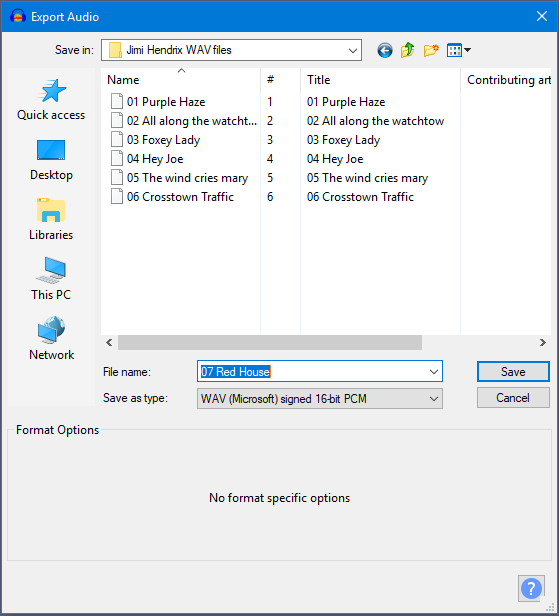
- WAV is a 16 bit PCM by Microsoft. Select that from the ” Save file as type” pointer. Consider the location where you want to export the file and file put it in there. Then save the file by the “Save in” menu. Mention the name of the file in the “File Name” bar.
- Click the save box. Your file is then saved. The file is in the format that burning programs of CD will surely recognize it.
Note: To burn the CD file one must possess the Audacity Editing software. Apart from this, you should also possess CD burning software. Click here for learn more.
Read more articles.
- Fades feature in Audacity
- Learn to use the Fade and Crossfade feature on Audacity
- Extra Menu – Transport as an option


