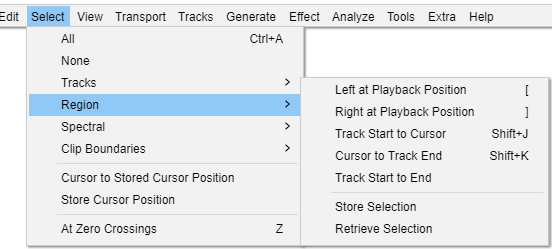
Select Menu: Region

From Audacity Development Manual
Jump to: navigation, search
This set of commands let you define selection regions and store and retrieve the position of the editing cursor or selection region.
Select Menu has commands that enable you make selections of tracks or parts of the tracks in your projectView Menu has commands that determine the amount of detail you see in all the tracks in the project window. It also lets you show or hide Toolbars and some additional windows such as Undo HistoryTransport Menu commands let you play or stop, loop play, scrub play or record (including timed and sound activated recordings)Tracks Menu provides commands for creating and removing tracks, applying operations to selected tracks such as mixing, resampling or converting from stereo to mono, and lets you add or edit labelsGenerate Menu lets you create audio containing tones, noise or silenceAudacity includes many built-in effects and also lets you use a wide range of plug-in effectsThe Analyze Menu contains tools for finding out about the characteristics of your audio, or labeling key featureThe Tools Menu contains customisable toolsThe Extra menu provides access to additional Commands that are not available in the normal default Audacity menusThe Help Menu lets you find out more about the Audacity application and how to use it.  It also includes some diagnostic tools.Selects all of the audio in all of the tracksDeselects all of the audio in all of the tracksTracksFor modifying, saving and restoring a selectionFor making a selection of a frequency rangeFor modifying a selection, taking account of clipsSelects from the position of the cursor to the previously stored cursor positionStores the current cursor position for use in a later selectionMoves the edges of a selection region (or the cursor position) slightly so they are at a rising zero crossing pointWhen Audacity is playing, recording or paused, sets the left boundary of a potential selection by moving the cursor to the current position of the green playback cursor (or red recording cursor)When Audacity is playing, recording or paused, sets the right boundary of the selection, thus drawing the selection from the cursor position to the current position of the green playback cursor (or red recording cursor)Selects a region in the selected track(s) from the start of the track to the cursor positionSelects a region in the selected track(s) from the cursor position to the end of the trackSelects a region in the selected track(s) from the start of the track to the end of the trackStores the end points of a selection for later reuseRetrieves the end points of a previously stored selectionThe MenusSelect-RegionMenu.png
Click for details
Click on the image to learn more


Left at Playback Position  [

When playing or recording: Sets the left boundary of a potential selection by moving the cursor to the current position of the green playback cursor (or red recording cursor). The selection can then be drawn by using "Right at Playback Position" (below).

When there is no audio playing or recording: Opens the "Set Left Selection Boundary" dialog. This is useful for keyboard users or for time-exact manipulation of the selection instead of using Selection Toolbar. Move the selection boundary dialog's time digits backwards to create a selection leftwards from the cursor position or to extend the current selection leftwards. Move the time digits forwards to move the cursor forwards to an exact point or to contract the current selection from the left. See "Creating selections at an exact time" for more details.

Right at Playback Position  ]

When playing or recording: Sets the right boundary of the selection, thus drawing the selection from the cursor position to the current position of the green playback cursor (or red recording cursor). This is a quick way to mark a selection for future editing while playing or recording. Selections can be labeled while playing or recording using Edit > Labels > Add Label at Selection or shortcut Ctrl + B.

It will usually be more convenient while playing or recording to use the equivalent keyboard shortcuts ( by default,  [  and  ]   ) to set the left and right boundary respectively.

When there is no audio playing or recording: Opens the "Set Right Selection Boundary" dialog. Move the dialog's time digits forwards to create a selection rightwards from the cursor position or to extend the current selection rightwards. Move the time digits backwards to move the cursor backwards to an exact point or to contract the current selection from the right.

Track Start to Cursor  Shift + J

Selects a region in the selected track(s) from the start of the track to the cursor position (or extends the current selection so that it starts from the start of the track).

Cursor to Track End  Shift + K

Selects a region in the selected track(s) from the cursor position to the end of the track (or extends the current selection so that it ends at the end of the track).

Store Selection  

Stores the current position of the selection region or cursor, as observed on the Timeline. The position of this region or cursor can then be recalled by using Retrieve Selection (see below). Using this command again will overwrite the previously stored position information.

The position is saved in memory for each project. Therefore using Retrieve Region will not have any effect in another project unless you have already used Store Region in that project. When you close a project, its stored region is discarded.

The Store Region command is grayed-out if there are no audio tracks.

Retrieve Selection  

Moves the selection region or cursor to the position stored by the last Store Selection command (see above). If a region is retrieved, this is only explicitly placed inside those tracks which are currently selected.

Warning icon
  • Only the position of the region or cursor is retrieved. No audio content is retrieved. Labels or split lines that were associated with the region or cursor are not retrieved.
  • The screen focus does not return to the retrieved position, so you may need to zoom out or scroll the project to see the retrieved position.
  • If the region was stored when in Spectrogram view, the spectral selection within the region is also retrieved, even if the region is retrieved when in another view. If the cursor position was stored when in Spectrogram view, the vertical position (and hence center frequency) of the click that placed the cursor is retrieved.

<  Back to: Select Menu